Digital Cards and Attendance
1. Barcodes and Digital Cards Overview
Check out the video below to learn about barcode types, printing barcodes, scanning barcodes, checking attendance history, and adding / editing attendance.
2. Printing Barcodes
Printing barcodes for Gracie Combatives students
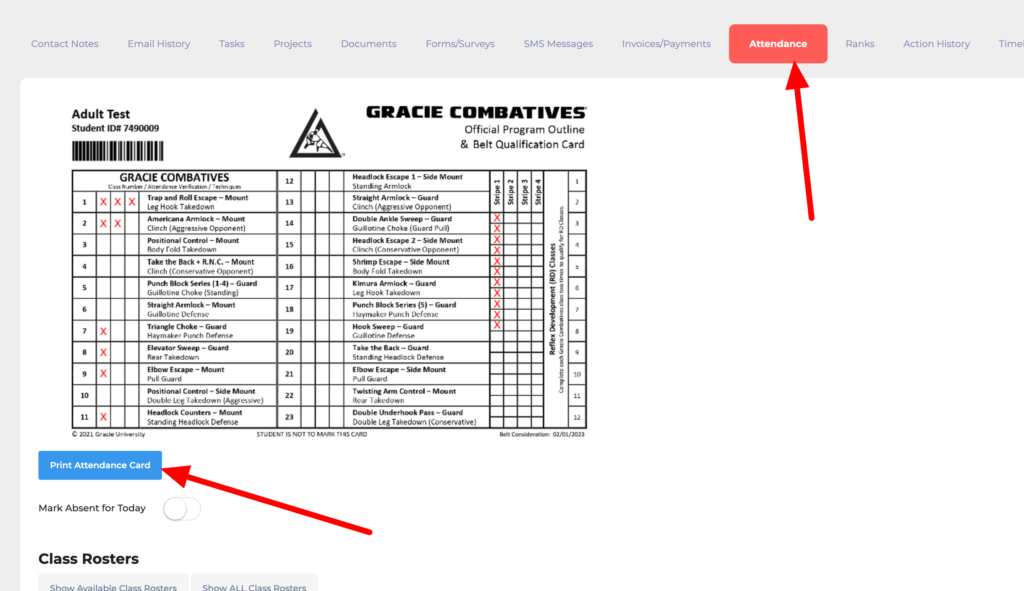
Since the contact barcode is included on the digital Gracie Combatives cards, you can simply print the entire digital card for any GC student to use for attendance scanning. Go to the student’s contract profile and scroll down to the attendance tab. Click the “Print Attendance Card” button below the digital card.

Printing barcodes for other students
You can print Spark’s barcodes onto Avery sticker labels and adhere them to your existing student’s paper cards.
In the Attendance and barcode basics video above, this process is detailed from the 3:50 mark to the 8:00 mark.
Action Steps:
- From the main menu, go to Attendance > Print Barcodes.
- *Optional* Click “Show Filters” and (recommended) select the ranks you would like to print labels for. Click “Update Filters” (Page will reload automatically)
- Click “Contact Labels”.
- Select the students you want to print labels for (you can select all by clicking the checkbox in the grey header of the student list.
- Scroll to the bottom of the page and click the “Print Selected Barcodes” button.
- In the popup, choose which label position you would like to print from. Choose 1 for a brand new sheet.
- Load the paper and print with normal 8.5×11, black and white print settings.
3. Scanning Barcodes
Let’s practice scanning a test account into the system. There are two prerequisites for completing the exercise below:
Attendance Barcode Scanning Exercise:
- Attach your scanner to your computer.
- In you have not already done so, print the Gracie Combatives digital card of your test account student.
- Navigate to Attendance > Scan Barcode.
- Choose the date and roster for the Gracie Combatives class that you have attached a Curriculum Skill to.
- Check the “Allow Multiple Attendance Same Day” checkbox (it is recommended to always have this checked)
- Click inside the “Enter Barcode” field.
- Scan the barcode on the printed card. (*you may need to click the “Enter Attendance” button to confirm the barcode scan and enter it into the system. Some barcode scanners automatically enter the code. You will know if it has been entered when you see the scan info display below the button)
- Review the scan info.
- Click “View Contact” in the scan info box.
- From the contact profile of your test student, scroll to the tabbed section and select the “Attendance” tab.
- Review the digital card and the attendance history below the card to verify that the correct Gracie Combatives class was tracked on the card and in the history list.
4. Manually Entering & Editing Attendance
Manually Edit Attendance Exercise:
- Navigate to the test student’s contact record that you used in the previous exercise to scan a barcode.
- Scroll to the attendance tab and locate the attendance history.
- Delete the barcode scan that you entered in the previous exercise.
- Manually remove the corresponding marks on the Gracie Combatives digital card as demonstrated in the video above.
- Manually add a new attendance entry.
- Check the digital card to verify that the corresponding “Skill” has been added to the card.
